Author: GeoSynSource Engineering Team
Category: Retaining Walls / Geogrid Applications / DIY Construction
Updated: November 2025
Introduction: Why Geogrid Matters for Every Retaining Wall
If you’re planning to build a retaining wall—whether in your backyard, garden, or driveway—you’ve likely come across the term “geogrid.”
That’s great news, because geogrid is one of the most effective and affordable tools for strengthening retaining walls and preventing soil failure.
At GeoSynSource, we specialize in advanced soil reinforcement products and geosynthetic solutions. In this article, our engineers explain how and when to use geogrid, especially for small block retaining walls that homeowners often build themselves.
1. How Does Geogrid Work?

There are two main types of retaining walls:
-
Gravity retaining walls – rely only on block weight to resist soil pressure. Suitable only for very short walls.
-
Reinforced retaining walls – combine the block weight with the strength of geogrid layers embedded behind the wall.
👉 For DIY projects, a reinforced retaining wall with geogrid is the safest and most durable choice.
2. When Should You Use Geogrid?
In general, any wall higher than 0.6 m (2 ft) benefits from reinforcement.
Rule of Thumb:
Geogrid Length = 0.8 × Retaining Wall Height
Example: If your wall is 1.5 m (5 ft) tall, use 1.2 m (4 ft) long geogrid layers.
Most small block systems recommend placing geogrid every second course of blocks, starting near the base.
Important: Always verify the manufacturer’s installation guide for your specific block system, as connection methods vary.
Before installing reinforcement, homeowners should first understand the 4 ft retaining wall geogrid decision, especially when soil, drainage, or surcharge loads are involved.
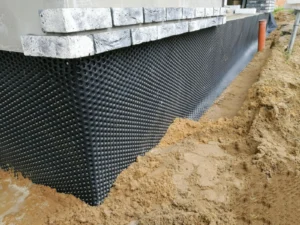
3. Drainage — The Hidden Key to a Strong Wall
Even though geogrid reinforces the structure, poor drainage is the #1 cause of retaining wall failure.
Behind the wall, install a 300 mm (12 in) thick drainage blanket of washed gravel wrapped in geotextile filter fabric.
This layer allows water to escape while keeping soil particles out, preventing hydrostatic pressure from building up behind the wall.
When geogrid layers intersect the drainage zone, carefully cut and wrap sections to maintain continuous drainage flow.
4. Step-by-Step Installation Guide
Follow these steps for a professional-grade retaining wall, even as a DIY builder:
-
Excavate and compact the base
Remove organic material, level the area, and build a compacted gravel leveling pad. -
Place the first course of blocks
Ensure perfect alignment and stability—the first row determines wall accuracy. -
Add the drainage blanket
Lay your geotextile-wrapped gravel zone directly behind the first row. -
Install the first layer of geogrid
-
Lay the grid flat on top of the first row of blocks.
-
Keep the front edge just inside the block face.
-
Stretch the grid tight—no wrinkles.
-
-
Backfill and compact soil
Add soil behind the wall to the full grid length, compacting in 200 mm (8 in) layers. -
Repeat for additional courses
Add geogrid every second block layer until reaching full height. -
Finish with proper surface drainage
Slope ground away from the wall and add surface drains if necessary.
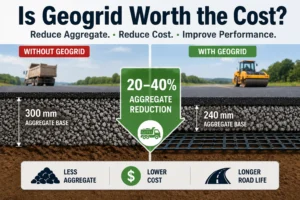
5. Choosing the Right Type of Geogrid
| Type | Direction | Typical Use | Material | Advantages |
|---|---|---|---|---|
| Biaxial Geogrid | Two-way | Driveways, small retaining walls | PP / HDPE | Easy to install, strong in both directions |
| Uniaxial Geogrid | One-way | High retaining walls | Polyester / Fiberglass | Higher tensile strength, designed for long-term loads |
💡 GeoSynSource provides both uniaxial and biaxial geogrids engineered for residential, commercial, and environmental applications. Contact us for technical data sheets.
6. Sustainability & Long-Term Performance
At GeoSynSource, we focus on sustainability and product durability:
-
Recycled polymer options to reduce carbon footprint
-
UV-resistant coatings for long-term outdoor exposure
-
Corrosion-proof design for use in aggressive soils
-
Reduced concrete dependency by reinforcing soil naturally
These innovations align with global trends in sustainable geosynthetics, helping builders achieve stronger yet eco-friendly designs.
7. Common Questions (FAQ)
Q1. How often should I install geogrid in my wall?
For small block walls, every second block course is typical. Taller walls may require every course.
Q2. What’s the best geogrid length?
Use about 0.8 × the wall height. Always confirm with manufacturer specifications.
Q3. Do I need an engineer for small retaining walls?
In most regions, walls under 1.2 m (4 ft) do not require engineering design. For higher walls or complex sites, consult a professional geotechnical engineer.
Q4. Can geogrid help with slope stabilization?
Yes—geogrids can reinforce slopes and embankments by increasing soil shear strength and preventing erosion.
8. Final Thoughts

A properly installed geogrid-reinforced retaining wall can last decades without structural issues.
By following best practices—correct grid length, consistent compaction, and effective drainage—you’ll have a wall that not only looks great but performs flawlessly.
While retaining wall reinforcement and driveway stabilization are different applications, you can also explore how long driveway grids last in gravel surface systems.
If you need professional-grade geogrid materials, technical guidance, or custom reinforcement designs, contact the GeoSynSource engineering team today.